Minihouse8888 Extension Review

My first experience with extensions started my senior year of high school when I decided I needed them for my prom hair. Little did I know this would become something that I ended up spending a ton of money on later on in my life. The whole reason I wanted them in the first place was because I have pretty fine hair and I just wanted fuller hair. After graduation I decided to start coloring my hair fashion colors which did a number on my natural hair. I went between having jet black hair to lavender in a bout a months time. (Cringe warning for hairstylists) My hair definitely began to suffer. I’ve had about every color under the sun on my head. With the randomly thrown in black hair in between. So I always ended up having to buy new extensions instead of just not dying them black. So I’ve tried my fair share of extensions: Sally beauty supply, bellami, luxy, random ones off ebay, plus a ton from sellers who don’t even sell them anymore. I’ve also tried random beauty supplies in my area. I found minihouse8888

I’ve had multiple sets of extensions from them including economical, remy , and even deluxe. They hands down have the best hair for the price. They are the only ones I’ve ever owned that haven’t ended up in a ratted tangled mess. They also sell wigs, ombre, and fashion color extensions to make things easier for you. I would definitely reccomend them to anyone looking to try some awesome hair for an even more awesome price.

So awesome that I made a whole video on them on my youtube!

_DSC0005

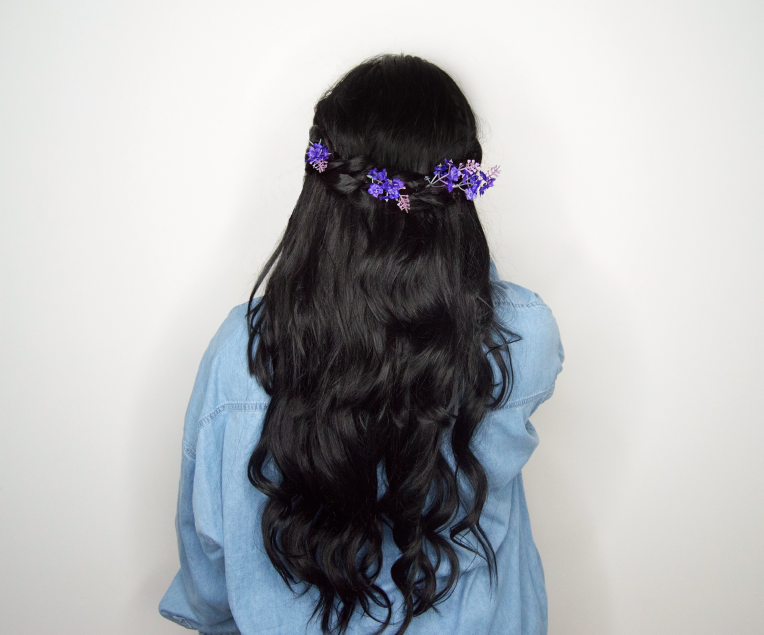
This is my hair with the luxury remy hair extensions in jet black #01

Stay tuned for a new video of my changing my hair color again (haha)

Thanks for reading

xo Heidi

Diy Embroidered babygirl shirt

I saw a tumblr post with a shirt that I really liked, So I followed the link to the website where I found out the shirt was like $28?!? Seriously I would never spend that much money on a shirt I could make myself. I went to walmart bought my supplies and ended up spending about $7.  So with basic knowledge of sewing I decided to try and recreate it.

Of course you could use any word, or design you want to recreate.


Supplies you’ll need:

dsc_0066

Plain t-shirt

Embroidery Hoop

Embroidery Thread

Needle

Your design printed out, or sketched on your shirt

dsc_0063dsc_0064dsc_0065dsc_0069dsc_0068

All you have to do is horizontally stitch following the design until you’re left with:


dsc_0001dsc_0017


Easy Diy My Little Pony Costume

Every year I get the task of making my nieces Halloween costumes, which usually ends up with lots of tulle and a lot of trying to make everything as perfect as I can.


Well this year, the task was MLP Rainbow dash & Twilight Sparkle.

So like any semi crafty person, I went to pinterest to try and find some Ideas.

I never just find one idea and stick to it. So this year I took these Ideas and ran with it.

I saw this post for a twilight sparkle tutu & wings that i liked.

Twilight

This headband / unicorn horn that I liked.

Unicorn Horn

Then or Rainbow Dash, I found this tutu:

Rainbow Dash

Ears

Ears

Wing & Ear tutorial

But where we live, there was no way they were going to be able to wear those crocheted tops, So we had to opt out for T-shirts with cutie marks drawn on them.

This is what we ended up with!


bothrdtsdsc_0040


If you have any questions; or need links, feel free to ask!


XOXO H


Getting Kpop Idol Hair!

I’m so fascinated by how fast Kpop idols change their hairstyles and hair color.

So I decided to ‘torture’ my husband by bleaching his hair and toning it. I uploaded it to youtube and decided to list the details and links on here as well!

Happy Saturday everyone! 🙂


Items used:
⸰ Wella color charm powder lightener tub (1lb) $21.99

Bleach
⸰ Salon care 40 volume creme developer (32 oz) $5.39

Developer
⸰ Sallys extra wide tint brush $1.59

Tint Brush
⸰ Sallys hair color mixing bowl $2.59

Bowl
⸰ Colortrak hair color mixing whisk $2.19

Whisk

⸰ Ion cool blonde shampoo $7.29

Shampoo


All items were purchased at Sallys Beauty supply

Bleach was processed for 20 minutes
Ion shampoo was left on for 30 minutes

Influenster Schwarzkopf Voxbox!

Let me just start off my saying, my hair is by no means healthy. I’ve been coloring my hair since about 7th grade which means it’s been a while 😉

It is currently a faded out red color, shoulder length and very fine in texture.

When I got the email saying I had been picked for the Schwarzkopf box I was elated.

I’m a hair product junkie and when I say this I mean it. Any time I’m at a drugstore I’m probably down the hair care isle looking for something to tame my damaged frizzy hair.

Well Thanks to influenster I’ve found some pretty awesome products.

IMG_2938

First up:

Schwarzkopf Styliste Satin Frizz Control & Protect Divine Finishing Polish, 6.8 fl oz $6.97

k2-_a0252a67-3e41-4de2-a9cc-4e7e2bde014d.v2

Actually makes my frizzy hair manageable and shiny, I haven’t seen my hair shiny in forever!

Next:

Schwarzkopf Styliste Ultime Satin Frizz Control & Protect Heat Protection Straightening Spray, 6.8 fl oz $6.97

k2-_b019d7d2-52f7-414d-bfc2-1a3552268bac.v1

I am alllll about heat protection when I’m heat styling my hair, This whole line also smells incredible.

and lastly:

Schwarzkopf Styliste Ultime Satin Frizz Control & Protect Heat Protection Straightening Style Cream, 6.1 oz $6.97

k2-_247a6603-e399-4054-b848-9afefe7b74d2.v2

This is the only one I haven’t tried yet, but I cant wait to!

I received all these products for free but all my opinions are my own.

Check out Influenster for more information and to join and awesome community with equally as awesome people.

xoxo H

DIY Yin Yang Tie Dye!

I’ve been rocking the tie dye since about 7th grade so when I saw this picture on pinterest I knew I had to try it!

78e378ad5d6f2bbb40733e3a1be02ea3

When I went to see how to make this specific design, I saw most people did it with two different colors, which looks awesome but I wanted more of the traditional Yin Yang colors so I went to the store to get some black dye and got started!

Step One: Gather Supplies:

DSC_0062

White shirt, gloves, fabric dye, gloves, plastic bag, squeeze bottle, rubber bands and awesome tunes 😉

Step 2: Wet the shirt

DSC_0063

Step 3: Find the middle of the shirt

DSC_0065

Step 4: Draw a rough outline of what you want

DSC_0066

I used a plastic tub, you could use a plate or anything round. This is where finding the middle of the shirt comes into play, trace your round shape onto the top half of the shirt then slide it down and do the opposite side.

DSC_0067

So that in the end you have the yin yang outline on the shirt

DSC_0069

Step 5: Tie up the “eyes” on both sides

DSC_0071

Step 6: Fan fold the rest of the shirt

DSC_0072

Step 7: Tie the middle of the shirt on the fold you just created.

DSC_0073

Step 8: fold and tie the rest of the shirt into whatever design you want

DSC_0074

Step 9: Dye the shirt

DSC_0075

Mix the dye inside the squeeze bottle according to the box directions

I used aluminum foil to cover the “eyes” so that no dye would get on places I didnt want.

Step 10: Let sit for 24 hours in bag.

And finally

Step 11: Rinse dye off shirt with cold water

DSC_0078

My final product doesn’t look like the pinterest post because my design/folding was a little different and i didn’t make the fabric dye as strong, but I’m very happy with it. ^.^

DSC_0079